

A proper caravan levelling guide is essential for anyone new to touring. Parking on uneven ground can affect sleeping comfort, fridge performance, shower drainage, and overall caravan stability. Learning how to level your caravan correctly makes every stay safer and far more enjoyable.
Whether you’re staying on grass, gravel, or hardstanding, understanding the basics of caravan levelling helps avoid many common beginner mistakes.
If you’re preparing for your first trip, our First Caravan Trip Checklist is also worth reading before setting off.
Why Caravan Levelling Matters
Many beginners underestimate how important caravan levelling really is.
An uneven caravan can cause:
- Uncomfortable sleeping positions
- Doors swinging open or shut
- Water draining incorrectly
- Poor fridge performance
- General instability inside the caravan
Modern caravan fridges work best when the caravan sits relatively level. According to Dometic, absorption fridges rely on proper positioning to operate efficiently.
Using a proper caravan levelling guide helps make your setup safer, more stable, and far more comfortable during your stay.
What Equipment Do You Need?
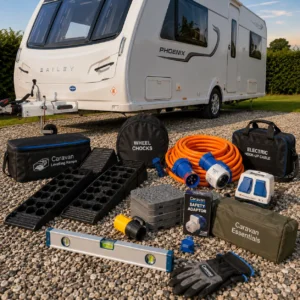
Most caravanners use simple levelling accessories that are quick to set up and easy to store.
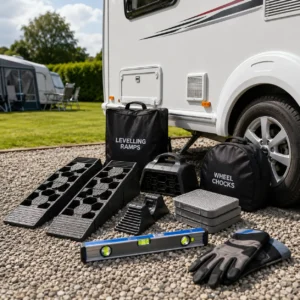
Common caravan levelling equipment includes:
- Caravan levelling ramps
- Wheel chocks
- Spirit level
- Corner steady pads
- Heavy-duty gloves
Many beginners start with basic plastic levelling ramps before upgrading to more advanced systems later.
A good caravan levelling guide always starts with simple, reliable levelling equipment.
Our What to Pack for a Caravan Holiday guide also includes several useful setup essentials.
How To Level Side-To-Side
Side-to-side levelling is usually the first step when arriving on-site.
To level correctly:
- Position the caravan roughly where you want it
- Check which side is lower
- Place levelling ramps beside the lower wheel
- Slowly reverse or tow onto the ramps
- Recheck using a spirit level
Take your time during this stage, especially on uneven grass pitches.
Proper caravan levelling becomes much easier once you understand how ramps and wheel positioning work together.
Many caravanners find that levelling becomes much easier after a few trips.
How To Level Front-To-Back
Once side-to-side levelling is complete, front-to-back levelling is adjusted using the jockey wheel.
Raise or lower the caravan carefully until the caravan sits level lengthways.
A simple spirit level placed inside the caravan helps confirm everything is balanced properly.
Proper caravan levelling helps improve comfort, appliance performance, and overall stability during your stay.
Using stabiliser legs to level the caravan is a very common beginner mistake. Stabiliser legs are designed for stability — not for lifting or levelling.
For additional towing and setup advice, The Caravan and Motorhome Club offers useful beginner resources.
Levelling On Hardstanding Pitches
In this caravan levelling guide, hardstanding pitches are often easier for beginners because the surface remains firm and stable.
Benefits of hardstanding pitches include:
- Better stability
- Better caravan levelling control
- Easier ramp positioning
- Cleaner setup in wet weather
- Reduced wheel sinking
However, some hardstanding pitches still slope slightly, so levelling equipment remains important.
We compared both pitch types in our guide to Hardstanding vs Grass Pitch – Which Is Better?.
Levelling On Grass Pitches
Levelling a touring caravan on grass pitches can sometimes be more challenging, especially after heavy rain.
Soft ground may cause:
- Caravan levelling on grass pitches often requires extra care during wet weather.
- Wheels sinking slightly
- Ramps moving
- Uneven settling overnight
Many caravanners use wider levelling pads or grip mats underneath ramps when staying on softer grass pitches.
Pitch choice can also affect setup difficulty. Our guide to How to Choose the Right Caravan Site explains what to look for before booking.
Common Caravan Levelling Mistakes
Every beginner makes mistakes during early trips.
The most common levelling mistakes include:
- Forgetting wheel chocks
- Overcorrecting the ramps
- Incorrect caravan levelling setup
- Using steadies for levelling
- Ignoring slight slopes
- Rushing setup
Many beginners struggle with caravan levelling during their first few trips, especially on uneven pitches.
Following a proper caravan levelling guide helps reduce frustration and improves your confidence on-site.
Do You Need Expensive Levelling Systems?
Most caravanners following a simple caravan levelling guide do not need expensive levelling systems when starting out.
Most caravanners start with:
- Standard levelling ramps
- A basic spirit level
- Simple wheel chocks
More advanced hydraulic or automatic levelling systems are available, but they are not essential for most touring setups.
For most beginners, basic caravan levelling equipment works perfectly well.
For many caravanners, simple equipment works perfectly well for years.
Final Caravan Levelling Tips
Before relaxing, this caravan levelling guide recommends completing a final setup check:
- Caravan feels stable when walking inside
- Doors stay in position
- Caravan levelling remains one of the most important parts of campsite setup.
- Fridge sits level
- Steadies are firmly lowered
- Wheel chocks are secure
Taking a few extra minutes during setup makes a huge difference to overall comfort during your stay.
Our Caravan Hook-Up Guide for Beginners is another useful setup guide once your caravan is levelled correctly.

Why Levelling Gets Easier With Experience
Following a beginner-friendly caravan levelling guide can feel intimidating at first, but most caravanners quickly develop a simple routine after a few trips.
After a while, setup becomes second nature:
- Position the caravan
- Check levels
- Adjust ramps
- Lower steadies
- Relax and enjoy the trip
Using a reliable caravan levelling guide helps remove much of the stress beginners often feel when arriving on-site for the first time.